Setting up Nix on macOS

I recently bought a Macbook because more and more people are asking me how to
use Nix in certain situations under MacOS.
In this article, we walk through installing Nix on MacOS and see how pleasant
the experience is these days.
After that, we show how to go declarative on MacOS with nix-darwin to enable
compilation for Linux and Intel Macs, as well as some other nice features.
🤷 Why would one want to have Nix on a Mac?
There are multiple reasons:
- Nixpkgs is the biggest and freshest open-source package repository in the world
- It’s better than homebrew
- Use the same package versions as your colleagues who use Nix on Ubuntu, Debian, Fedora, etc.
- Programmers and admins: Toolchain management is easily done per project with
the single command
nix develop. Forget about Docker annoyances for development.
In addition to that, we’re looking at nix-darwin in this article, which adds
the following reasons on top:
- Declarative configuration of all your macOS system settings
- Installation of packages and configuration of those
- Seamless integration into
launchdfor configuration of additional daemons - Painless management of local Linux builder VMs
This article is about two steps and provides additional info for each:
- Install Nix
- Bootstrap
nix-darwin
On every new Mac, it’s just two command-line invocations if your nix-darwin
configuration is already prepared.
🌱 Step 1: Installing Nix on macOS
There are multiple ways to install Nix. The possibly most obvious way (at least on GNU/Linux) is to use another package manager to install Nix. Generally, don’t do that.
Especially on macOS, three different ways work well:
- Official Nix installer from
nixos.org - Determinate System’s Nix Installer for the shell
- Determinate Systems’s graphical installer for macOS
The determinate systems installers have a few advantages over the original Nix installer:
- It provides a nicer overview of the installation steps
- It is designed to survive macOS upgrades
- Nix Flakes are enabled by default
- The installation and configuration can be customized
The graphical installer has two additional perks:
- It can be used in combination with mobile device management (MDM) solutions
- This installer is signed with Determinate System’s Apple developer ID
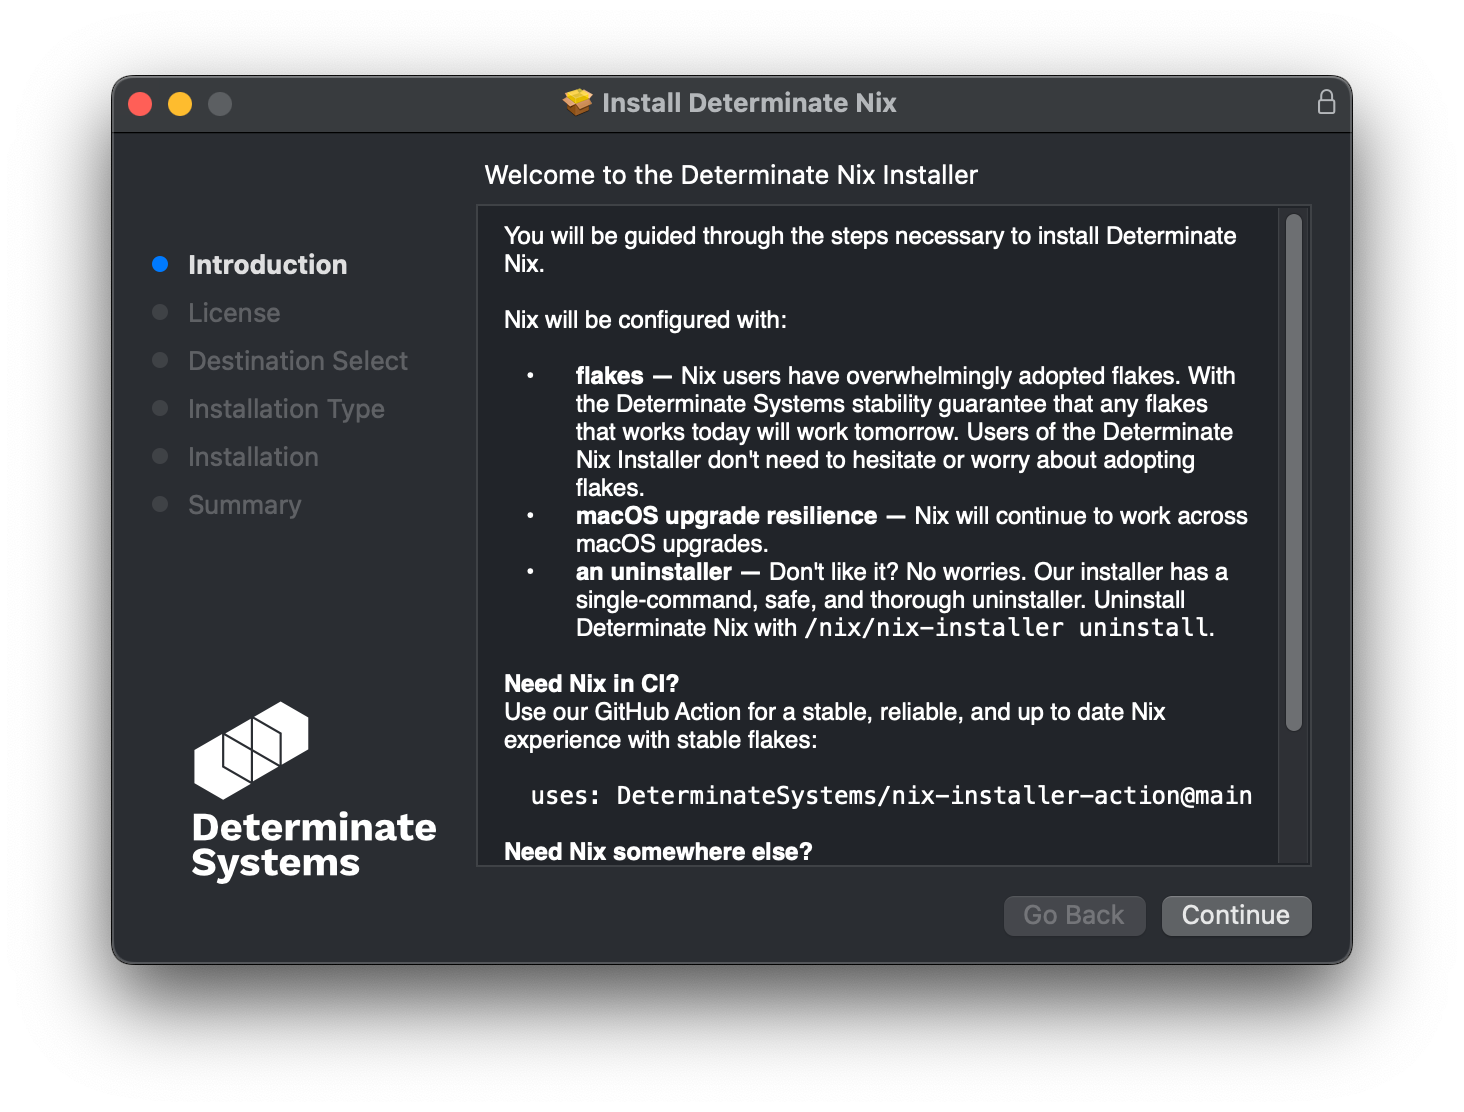
I chose to use Determinate System’s shell installer, which is a one-liner as described in their GitHub repository (spread over multiple lines here to increase readability):
curl \
  --proto '=https' \
  --tlsv1.2 \
  -sSf \
  -L https://install.determinate.systems/nix \
  | sh -s -- install
The installation just takes a minute or two. After running the command, the installer asks for the sudo password and then prints a nice explanation about what it will do with our system, which we can accept or deny:
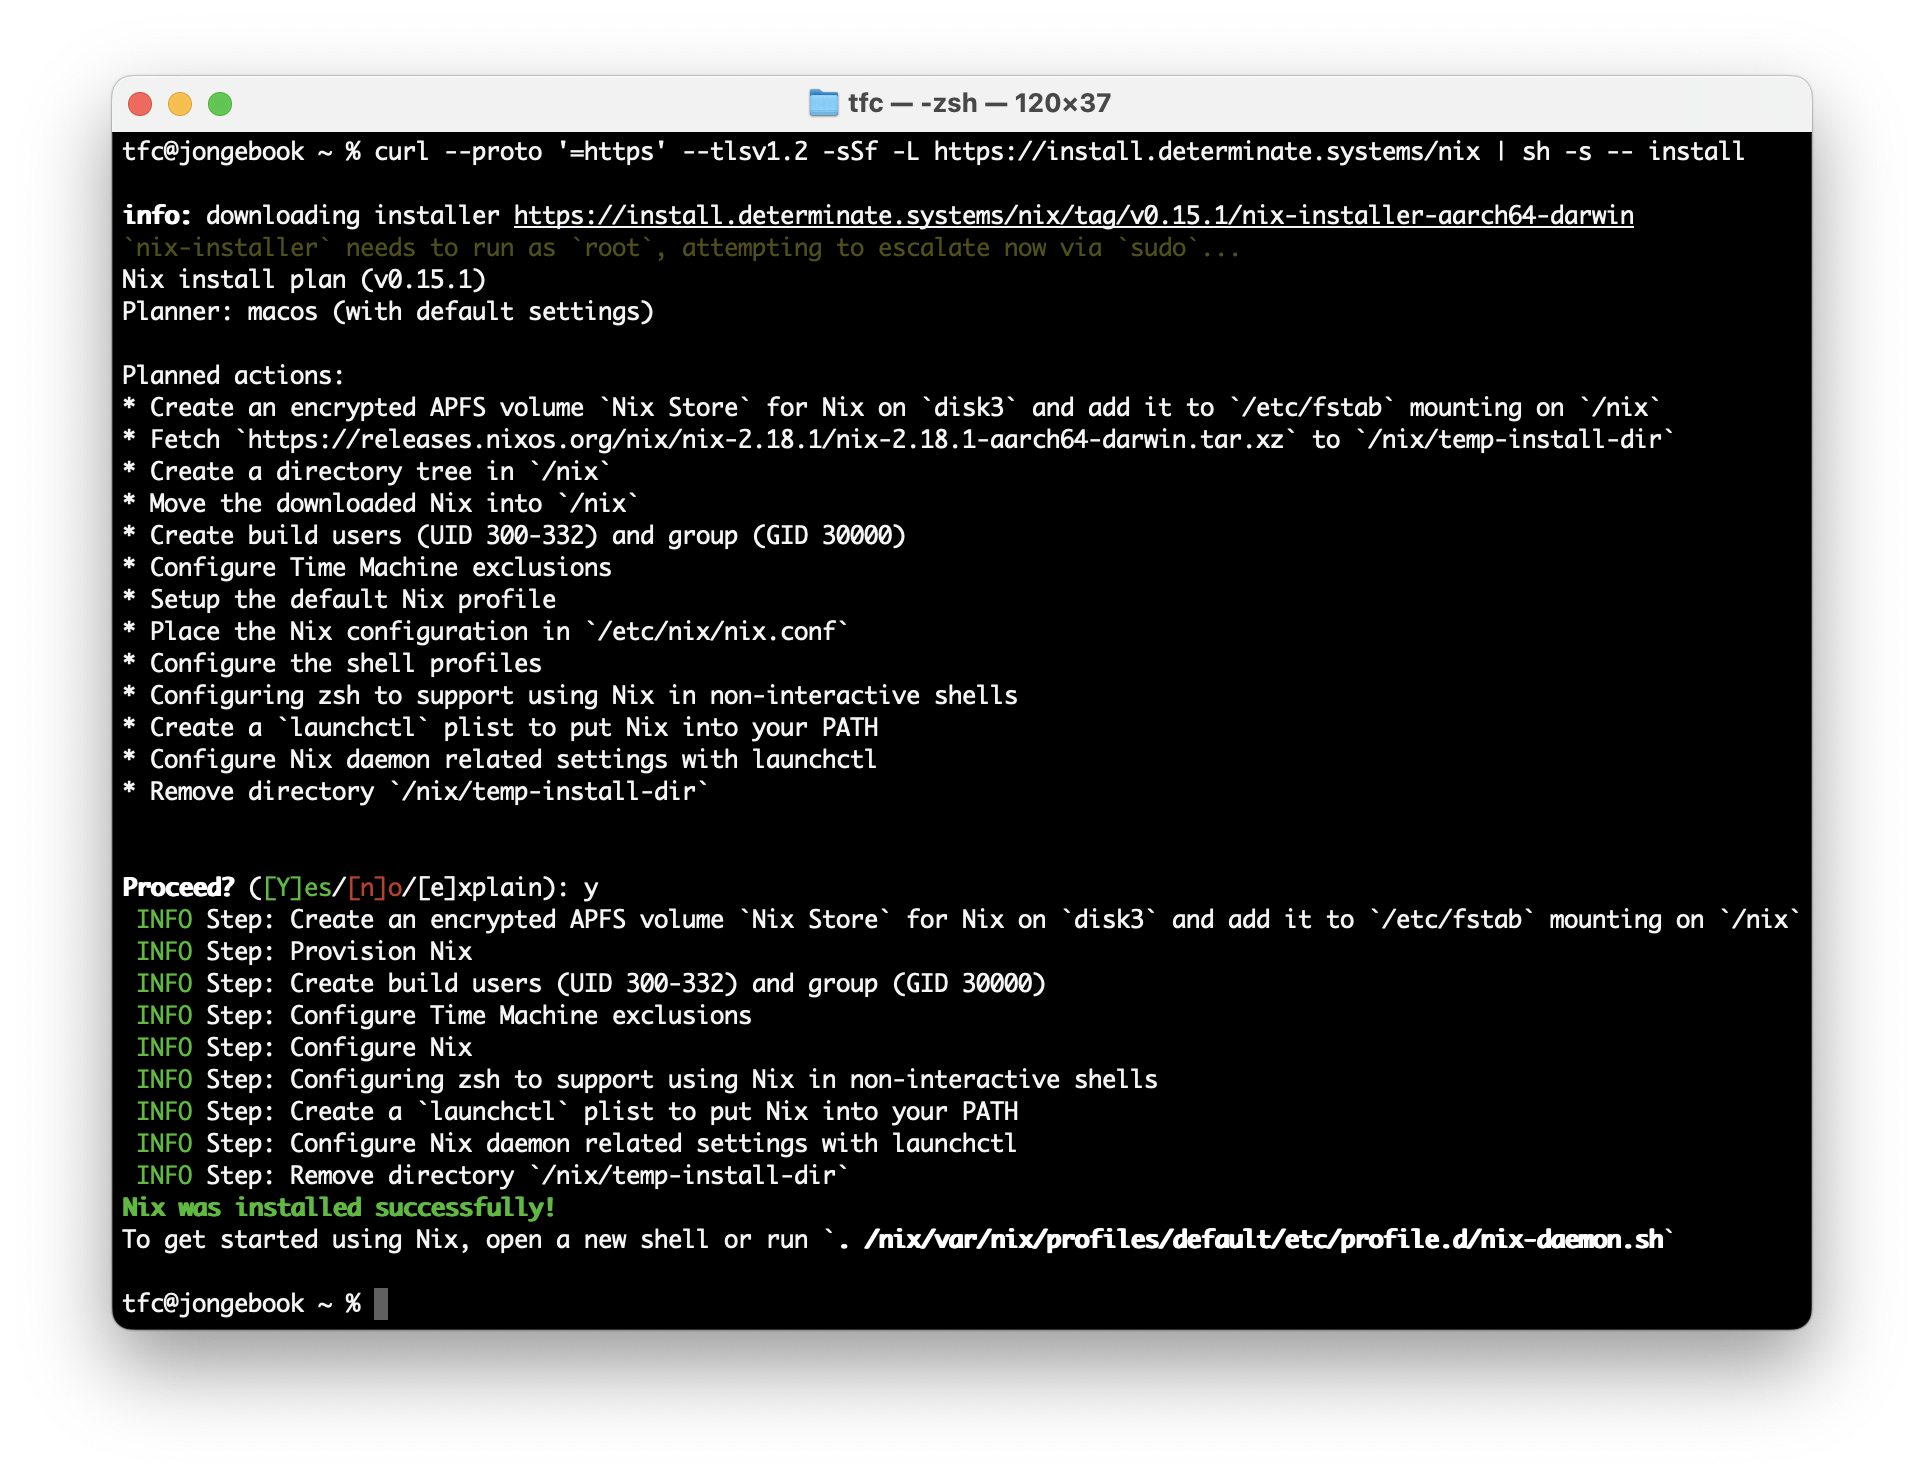
It’s advisable to check if there have been any errors during the installation and if there are none, close the shell and start a new one. We don’t need to restart the system.
To test if Nix generally works, just run GNU hello or any other package:
$ nix run nixpkgs#hello
Hello, world!
If you’re new to Nix, make sure you get a copy of the Nix cheat sheet. It’ll give you the best possible overview of the commands available!
🛫 Step 2: Going declarative with nix-darwin
With Nix installed, we have all the Nix shell magic (using nix develop,
nix shell) at our disposal and can build and run (using nix build and
nix run) random projects/packages from the internet, which is great.
However, if we imagine having to install packages using
nix profile install ... on every other Mac, we’re not much better off than
with classical package management.
Also, this doesn’t manage our configurations and services, which is exactly
what we’re used to from NixOS.
The general idea is that we want to have one big configuration file (possibly scattered over multiple files for better structure and composability) that sets our system up as we want it with one single command.
This is where nix-darwin enters the
scene:
As the project description says, this project aims to bring the convenience of a
declarative system approach to macOS.
Starting from zero, we can initialize a new nix-darwin configuration file in
some configuration folder:
$ mkdir nix-darwin-config
$ cd nix-darwin-config
$ nix flake init -t nix-darwin
This creates a flake.nix file like this:
{
  description = "Example Darwin system flake";

  inputs = {
    nixpkgs.url = "github:NixOS/nixpkgs/nixpkgs-unstable";
    nix-darwin.url = "github:LnL7/nix-darwin";
    nix-darwin.inputs.nixpkgs.follows = "nixpkgs";
  };

  outputs = inputs@{ self, nix-darwin, nixpkgs }:
  let
    configuration = { pkgs, ... }: {
      # List packages installed in system profile. To search by name, run:
      # $ nix-env -qaP | grep wget
      environment.systemPackages =
        [ pkgs.vim
        ];

      # Auto upgrade nix package and the daemon service.
      services.nix-daemon.enable = true;
      # nix.package = pkgs.nix;

      # Necessary for using flakes on this system.
      nix.settings.experimental-features = "nix-command flakes";

      # Create /etc/zshrc that loads the nix-darwin environment.
      programs.zsh.enable = true;  # default shell on catalina
      # programs.fish.enable = true;

      # Set Git commit hash for darwin-version.
      system.configurationRevision = self.rev or self.dirtyRev or null;

      # Used for backwards compatibility, please read the changelog before changing.
      # $ darwin-rebuild changelog
      system.stateVersion = 4;

      # The platform the configuration will be used on.
      nixpkgs.hostPlatform = "x86_64-darwin";
    };
  in
  {
    # Build darwin flake using:
    # $ darwin-rebuild build --flake .#simple
    darwinConfigurations."simple" = nix-darwin.lib.darwinSystem {
      modules = [ configuration ];
    };

    # Expose the package set, including overlays, for convenience.
    darwinPackages = self.darwinConfigurations."simple".pkgs;
  };
}
At the beginning, we generally want to change two things here:
- The
nixpkgs.hostPlatformsetting must beaarch64-darwinon Macs with Apple Silicon CPUs. On Intel-based Macs it can be left asx86_64-darwin. - The
simplepart at the bottom of the file in thedarwinConfigurations."simple"attribute can be renamed to our hostname. This way we don’t need to provide the name explicitly when building or rebuilding the system configuration.
This is enough to start.
Bootstrapping this new configuration can be done even without installing any
nix-darwin-related packages with a single command:
$ nix run nix-darwin -- switch --flake .The last parameter still needs to be
--flake .#simpleif we didn’t rename the configuration attribute at the bottom of the file.
The installation process might warn us of files that could destructively be overwritten. We need to back up or remove them (on a new Mac, I typically just delete) first:
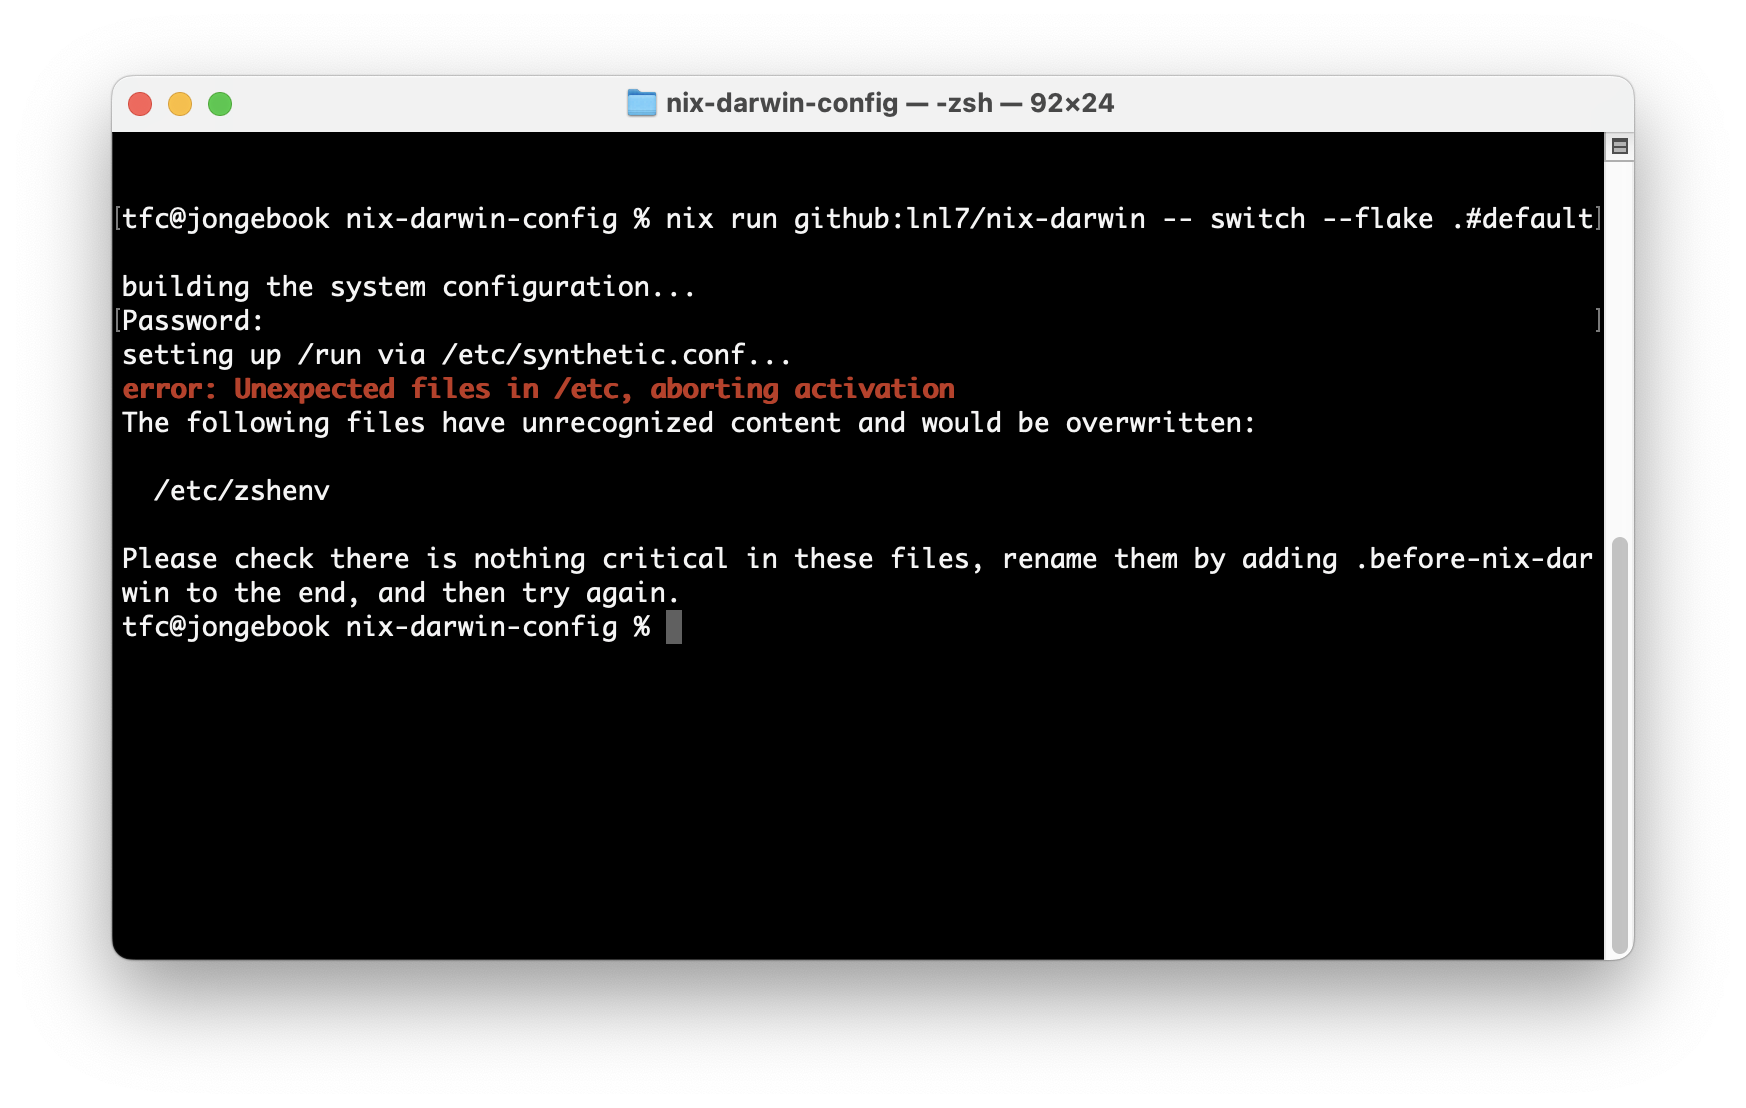
After handling these files, we can simply run the script again.
nix-darwin is now bootstrapped on our system, which gives us the
darwin-rebuild command that is similar to
nixos-rebuild on NixOS hosts.
We can now run darwin-rebuild switch --flake . anytime.
Additional nix-darwin goodies
The new nix-darwin config did not do much to our system.
It’s just a starting point.
What now?
Have a look at the
nix-darwin configuration options Documentation
which lists and describes all the available options.
This overview is a goldmine - there is something for everyone.
Let’s have a look at a few nice examples:
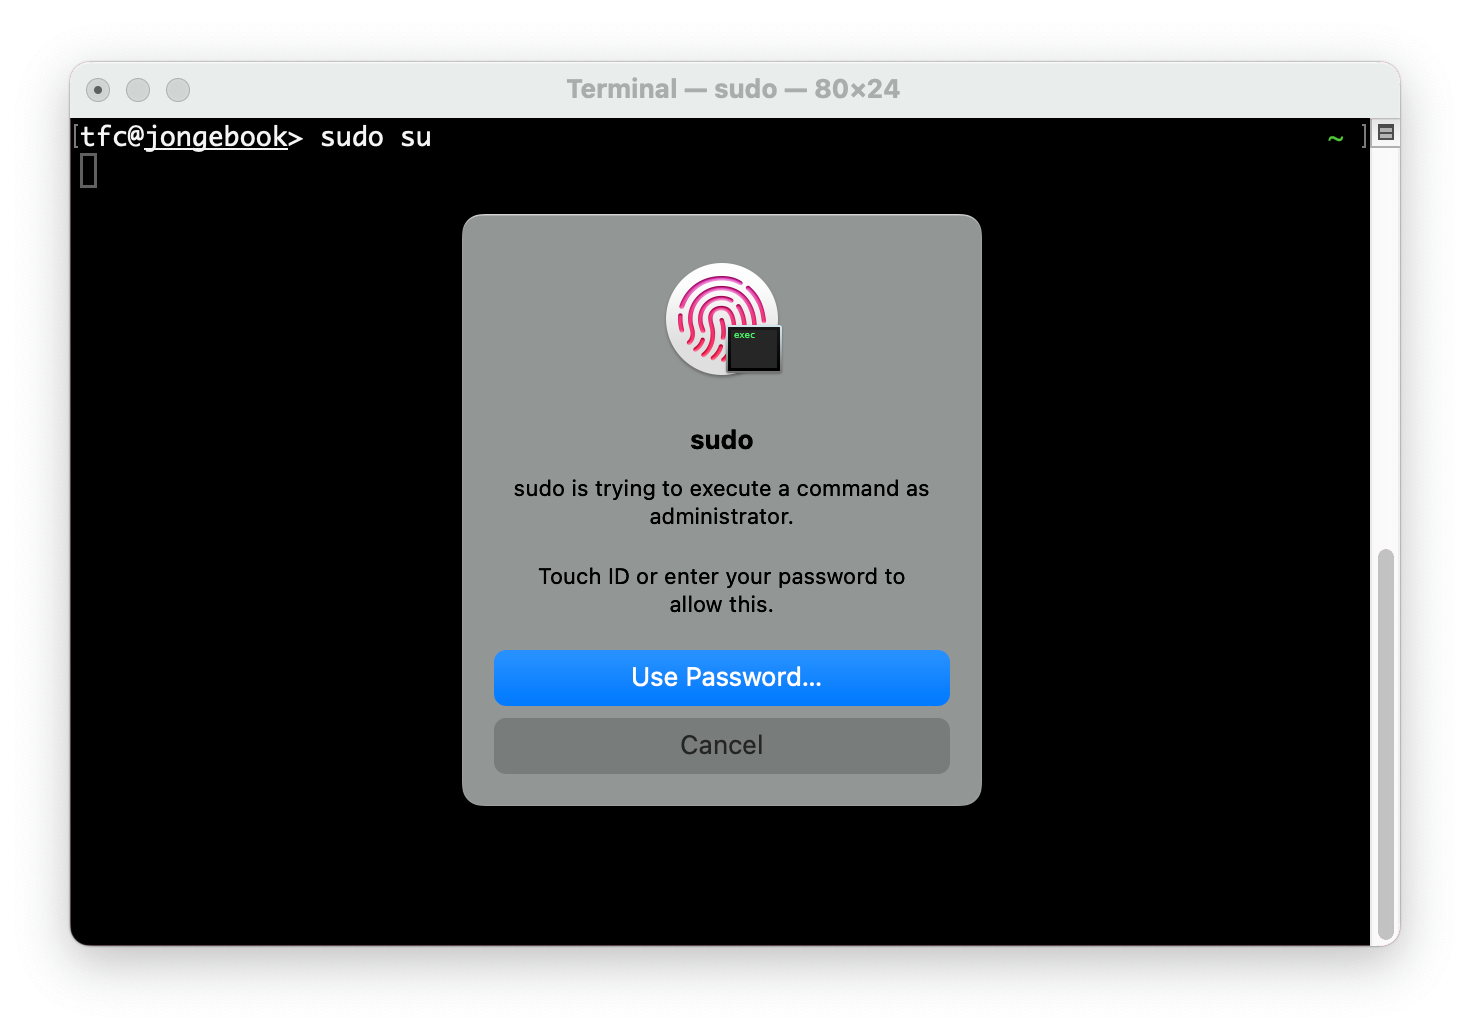
Unlocking sudo via fingerprint
If we have a Mac with Touch ID, we can
unlock sudo commands with our fingerprint instead of typing the password.
This is of course not exclusive to nix-darwin users, but these have it
particularly easy to enable it.
Simply add the following line to the new config:
security.pam.enableSudoTouchIdAuth = true;Rebuild and apply the config using
$ darwin-rebuild switch --flake .Generally, reboots aren’t necessary, but this specific setting needs a reboot.
Voila, this is how it looks in action:
Setting System Defaults
nix-darwin provides configuration lines for many different macOS default
settings.
These can typically be altered using UI application setting dialogues or
with the defaults terminal command.
However, nix-darwin manages them all for us:
system.defaults = {
  dock.autohide = true;
  dock.mru-spaces = false;
  finder.AppleShowAllExtensions = true;
  finder.FXPreferredViewStyle = "clmv";
  loginwindow.LoginwindowText = "nixcademy.com";
  screencapture.location = "~/Pictures/screenshots";
  screensaver.askForPasswordDelay = 10;
};
This example configuration snippet sets:
- macOS dock hides automatically
- Don’t rearrange spaces based on the most recent use
- Finder shows all file extensions
- Default Finder folder view is the columns view
- The login window shows a specific text as a greeting
- When taking screenshots, store these in a specific folder
- Only ask for a password in the screensaver if it is running for longer than 10 seconds
Apple Silicon Macs: Compile Intel Binaries
Apple Silicon Macs can install Rosetta, which enables the system to run binaries for Intel CPUs transparently.
The installation still needs to be done manually in the terminal with this command:
$ softwareupdate --install-rosetta --agree-to-licenseAfter that, we can add this line to our nix-darwin configuration and rebuild
again:
nix.extraOptions = ''
  extra-platforms = x86_64-darwin aarch64-darwin
'';
Now, we can build and run binaries for both CPUs:
$ nix run nixpkgs#legacyPackages.aarch64-darwin.hello
Hello, world!
$ nix run nixpkgs#legacyPackages.x86_64-darwin.hello
Hello, world!
Although this feature is a relatively specific developer use case, it’s nice to see how easy it is to configure.
Building Linux binaries
If we want to build binaries or even full system images for GNU/Linux systems, we typically end up delegating builds to remote builders.
nix-darwin provides a neat Linux builder that runs a NixOS VM as a service in
the background.
It can simply be activated with one additional configuration line:
nix.linux-builder.enable = true;It works on both Apple Silicon and Intel-based Macs.
The VM itself is bootstrapped by downloading it from the official NixOS cache.
It comes with pre-installed SSH keys, which nix-darwin also handles elegantly
for us on the host side.
After rebuilding the system, we can test it.
With a quick dummy derivation that simply writes the output of the command
uname -a into its output path, we can check that it is executed in fact on
our new Linux builder:
$ nix build \
  --impure \
  --expr '(with import <nixpkgs> { system = "aarch64-linux"; }; runCommand "foo" {} "uname -a > $out")'
$ cat result
Linux localhost 6.1.72 #1-NixOS SMP Wed Jan 10 16:10:37 UTC 2024 aarch64 GNU/Linux
Wow - how does it work?
- There is a daemon called
org.nixos.linux-builderrunning on our system, which keeps SSH keys and disk image in/var/lib/darwin-builder /etc/ssh/ssh_config.d/100-linux-builder.confcreates an SSH host-aliaslinux-builder/etc/nix/machinescontains a remote builder entry
This specific VM is also documented in the nixpkgs documentation.
📲 Updating the System
Updating the system involves two steps:
- Updating the Nix flake inputs
- Rebuilding the system
$ nix flake update
$ darwin-rebuild switch --flake .
If the configuration resides in a git repository,
nix flake update --commit-lock-file can automatically commit the lock file
changes.
Conclusion
Some Apple fans might like setting up a new system each time, but most of us want things to be simple and in sync.
Nix in combination with nix-darwin is an unbeatable combination - on a new
Mac, we can simply perform two steps:
- Install Nix with one of the installers
- Run
nix run nix-darwin -- --flake github:my-user/my-repo#my-config
…and we’re done. From Finder etc. UI settings, over preinstalled packages, to additional daemons, it’s all in there!
If you have questions on how Nix fits into your corporate workflow or how to make it work for you to make your teams even more productive, don’t hesitate to reach out to us via mail or schedule a quick call ! 💪
Have a look at the next macOS article where we improve the Linux builder!