Unveiling the Power of the NixOS Integration Test Driver (Part 2)
The first part of this article series on the NixOS Integration Test Driver already highlighted why it is one of the killer features of the Nix(OS) ecosystem. NixOS integration tests…
- make it easy to set up complex test scenarios
- build, set up, and run very quickly
- let the programmer express complex test sequences easily by using Python
- run reproducibly in the Nix sandbox
- produce the same results locally as in your CI infrastructure
In this part, we are going to learn how it works!
After we have seen the immense capabilities of the NixOS integration test driver, let’s create a runnable example and then dissect it a bit.
Architecture of the Test Orchestration
To understand how this all works, let’s start with the general anatomy of a NixOS integration test. The following minimal example shows the typical form of a NixOS integration test:
# File: test.nix
{
  name = "Two machines ping each other";

  nodes = {
    # These configs do not add anything to the default system setup
    machine1 = { pkgs, ... }: { };
    machine2 = { pkgs, ... }: { };
  };

  # Note that machine1 and machine2 are now available as
  # Python objects and also as hostnames in the virtual network
  testScript = ''
    machine1.systemctl("start network-online.target")
    machine2.systemctl("start network-online.target")
    machine1.wait_for_unit("network-online.target")
    machine2.wait_for_unit("network-online.target")

    machine1.succeed("ping -c 1 machine2")
    machine2.succeed("ping -c 1 machine1")
  '';
}
This test has a declarative infrastructure part that describes the
configuration of all involved NixOS hosts that will be available in the virtual
network, which happens in the nodes attribute set.
The machines in this example are called machine1 and machine2.
Then, the test describes the imperative part of the test in the testScript,
which is plain Python.
We can see that for every host in the nodes attribute, we get a Python machine
object with the same name!
This script simply waits until both machines are online after they are started
and then lets them ping each other.
The last two test lines show that for every host in the nodes attribute set,
not only Python variables are generated, but also DNS names in the virtual
network.
This test description alone does not run yet, as we would need to call it
with the pkgs.testers.runNixOSTest function.
A standalone example flake that does this could look like the following:
# File: flake.nix
{
  description = "Example NixOS Integration Tests";

  inputs = {
    nixpkgs.url = "github:NixOS/nixpkgs/nixos-unstable";
  };

  outputs = inputs@{ flake-parts, ... }:
    flake-parts.lib.mkFlake { inherit inputs; } {
      systems = [ "x86_64-linux" "aarch64-linux" ];
      perSystem = { pkgs, ... }: {
        packages.default = pkgs.testers.runNixOSTest ./test.nix;
      };
    };
}
A minimal non-flake version of this test might look like this:
# File: default.nix
let
  pkgs = import <nixpkgs> {};
in

pkgs.testers.runNixOSTest ./test.nix
Running nix -L build on the flake version or nix-build on the non-flake
version will:
- Build the individual VMs
- Configure and prepare the test driver
- Run the test driver to perform the whole test
Although it is all just a single command for us: Building the VMs and the test driver and then running the test happens in individual Nix sandboxes. Building/rebuilding is very quick and we will later explore, why.
You can also clone this example from the GitHub Repo: https://github.com/tfc/nixos-integration-test-example/blob/main/flake.nix
How Does It Work?
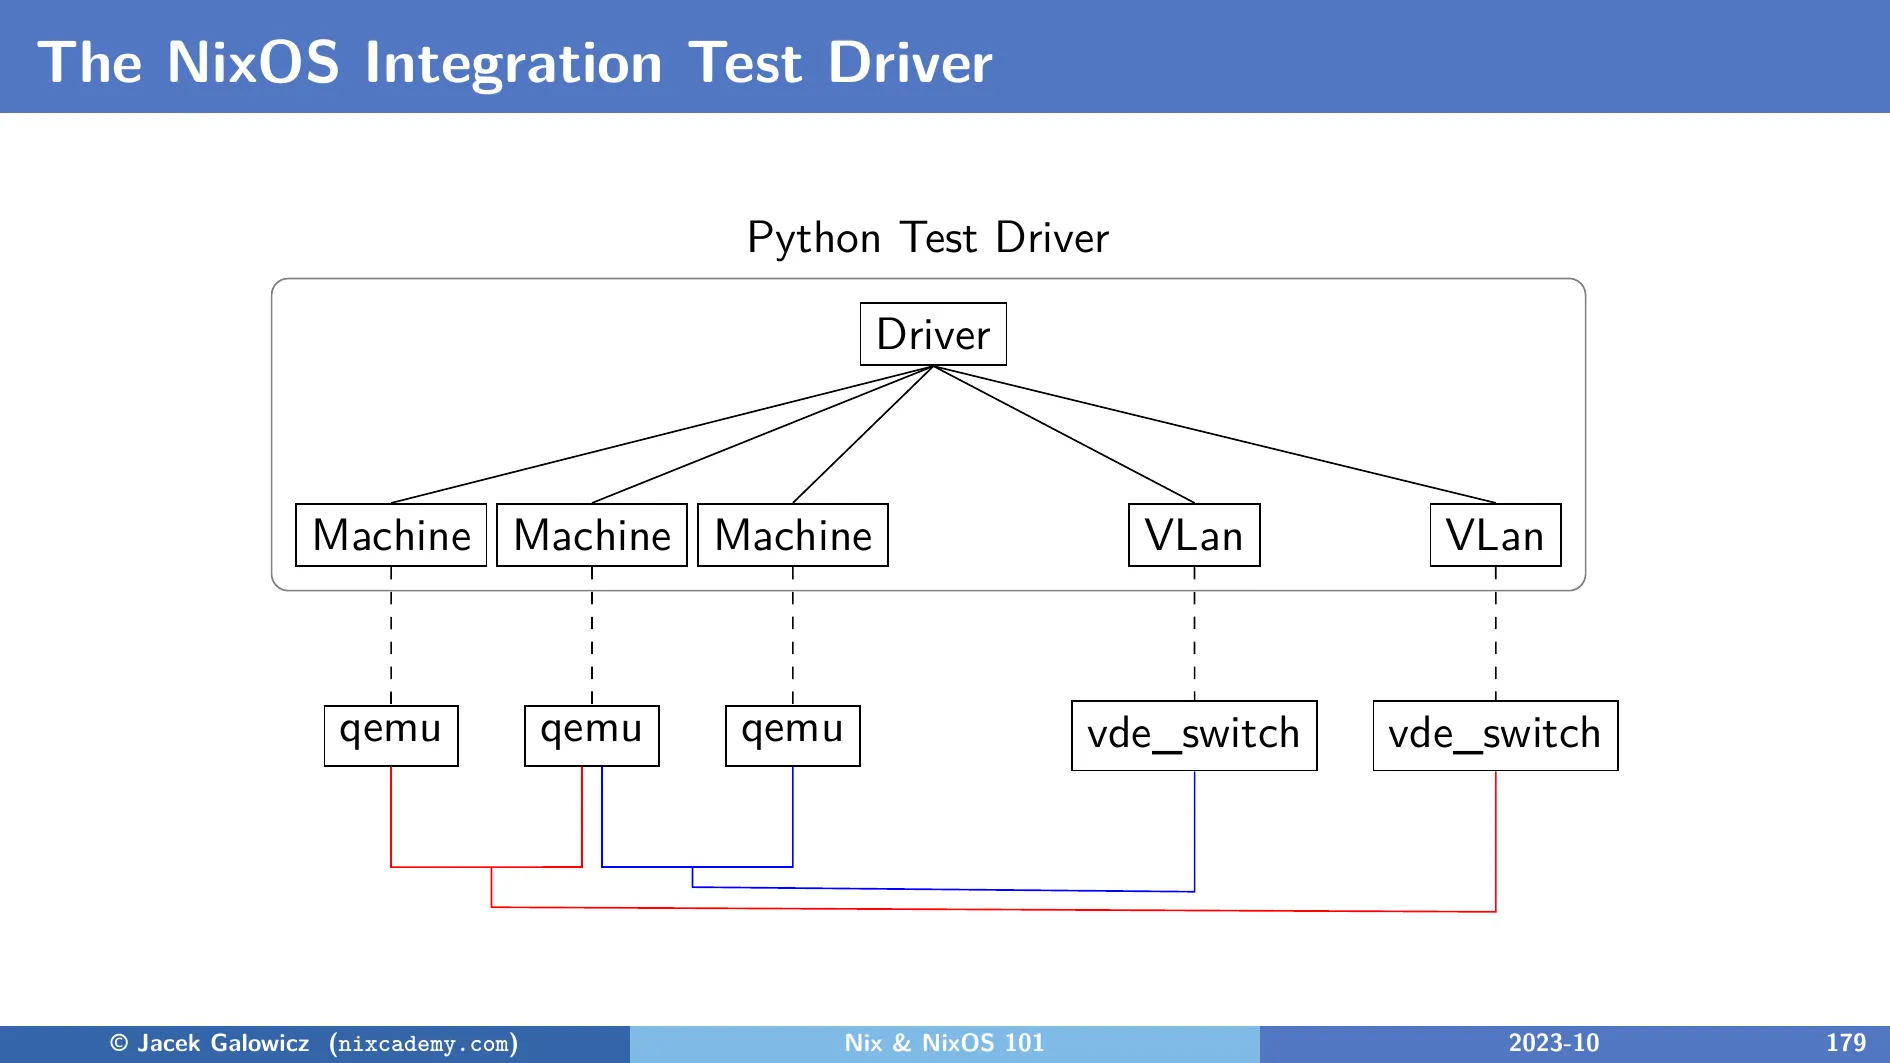
The declarative infrastructure part configures the test driver to create all necessary objects like in this diagram:
Machine Objects
The machine1 and machine2 variables from the example test are instances
of the Machine class.
An object of this type starts and manages the Qemu process that runs the VM.
It controls the VM with a monitor socket and it can also run shell commands
via a virtual console (Inside the guest, this is the /dev/hvc0 device).
Machine objects can start and stop VMs, launch commands inside the guest,
check the state of TCP ports or systemD services, copy files between guest
and host, take screenshots, perform OCR text recognition, and more:
Have a look at
its class methods in the NixOS documentation.
(Link to the implementation of the Machine class)
VLan Objects
Although our example test only creates one network, multiple different
networks can be configured.
Each machine instance can have one or more network interfaces that are
connected to individual virtual networks.
Each VLan object controls a vde_switch process which is an app from the
VDEv2 Virtual Distributed Ethernet project.
(Link to the implementation of the VLan class)
Driver Object
This class instantiates and controls the lifetime of all objects and provides the command line interface for the user. It is typically run inside the Nix sandbox, but developers can also enable display support and the interactive mode to facilitate debugging test scenarios outside of the sandbox (see later in this article).
(Link to the implementation of the Driver class)
I invite you to change the test script or the VM configurations and then re-run the test. Regardless if a configuration change of one or multiple nodes requires a rebuild of the VM(s) or it is just a change in the test script, the next rebuild and rerun of the test will happen very quickly - typically in seconds (unless you added settings that trigger downloads of a long list of new dependencies). To understand why they build and run so quickly, let’s first have a look at how the individual VMs in a test scenario are created.
Deep Dive into VM Creation
The integration test driver uses Qemu VMs with KVM support for fast virtualization.
Let’s build a single VM the same way the NixOS integration test driver does it:
# file: vm.nix
let
  pkgs = import <nixpkgs> {};

  module = { modulesPath, ... }: {
    imports = [
      (modulesPath + "/virtualisation/qemu-vm.nix")
    ];

    virtualisation.graphics = false;
  };

  nixos = pkgs.nixos [ module ];

in

nixos.config.system.build.vm
Every NixOS configuration that includes
the /virtualization/qemu-vm.nix module
will later provide a ...system.build.vm attribute after the pkgs.nixos
function evaluated it.
This attribute is a Nix derivation that not only builds the configuration of the
NixOS system but also wraps it into a shell script that starts Qemu with the
right command line parameters.
We can build and run it using $(nix-build vm.nix)/bin/run-nixos-vm and get the
following Qemu window:

This is neat because we don’t need to install Qemu separately. Let’s have a look at the generated script:
$ nix-build vm.nix
$ cat result/bin/run-nixos-vm
#! /nix/store/q1c2flcykgr4wwg5a6h450hxbk4ch589-bash-5.2-p15/bin/bash

# ...

# Start QEMU.
exec /nix/store/v6r36lyl0c6cjd9n4d9vhqqwh1vrisdh-qemu-host-cpu-only-8.1.2/bin/qemu-kvm -cpu max \
    -name nixos \
    -m 1024 \
    -smp 1 \
    -device virtio-rng-pci \
    -net nic,netdev=user.0,model=virtio -netdev user,id=user.0,"$QEMU_NET_OPTS" \
    -virtfs local,path=/nix/store,security_model=none,mount_tag=nix-store \
    -virtfs local,path="${SHARED_DIR:-$TMPDIR/xchg}",security_model=none,mount_tag=shared \
    -virtfs local,path="$TMPDIR"/xchg,security_model=none,mount_tag=xchg \
    -drive cache=writeback,file="$NIX_DISK_IMAGE",id=drive1,if=none,index=1,werror=report -device virtio-blk-pci,bootindex=1,drive=drive1,serial=root \
    -device virtio-keyboard \
    -usb \
    -device usb-tablet,bus=usb-bus.0 \
    -kernel ${NIXPKGS_QEMU_KERNEL_nixos:-/nix/store/c9q8djahspxy8j62966as3yrqn1nq46f-nixos-system-nixos-24.05pre-git/kernel} \
    -initrd /nix/store/9043m28r4sv6zzcq1sl835icgf0adx0y-initrd-linux-6.1.63/initrd \
    -append "$(cat /nix/store/c9q8djahspxy8j62966as3yrqn1nq46f-nixos-system-nixos-24.05pre-git/kernel-params) init=/nix/store/c9q8djahspxy8j62966as3yrqn1nq46f-nixos-system-nixos-24.05pre-git/init regInfo=/nix/store/7rfbkkywyqsk9bf36w3y7xk3inwsikmw-closure-info/registration console=tty0 console=ttyS0,115200n8 $QEMU_KERNEL_PARAMS" \
    -nographic \
    $QEMU_OPTS \
    "$@"
As we can see, after a bit of a prelude, it launches Qemu with a specific VM
configuration that spans over CPU core count, memory size (it’s all configurable
via the NixOS configuration as specified by the qemu-vm.nix module),
networking, disk drives, etc.
The most interesting part regarding rebuild and launch speed is the following line:
-virtfs local,path=/nix/store,...
This line mounts the host’s Nix store 1:1 into the guest system (don’t worry, the VM process can’t modify it). The significance of this is clear:
The rebuild time of a modified NixOS test VM configuration is nearly zero because this method does not create a VM image!
However, strictly speaking, the line with
-drive ...,file="$NIX_DISK_IMAGE",... mounts an image, but it does not contain
system files or configuration.
The shell script creates a small nixos.qcow2 file if it does not exist already
and mounts it as the root file system of the VM.
Its purpose is to keep state like password changes, logs, database content, etc.
so it survives reboots.
To dispose of that state, it can be deleted between boots.
Interactive Mode and Debugging
If a test that runs longer than a minute fails and we want to fix it, it would of course be frustrating to add changes and/or debug lines and then wait and watch the whole test again and again until it fails.
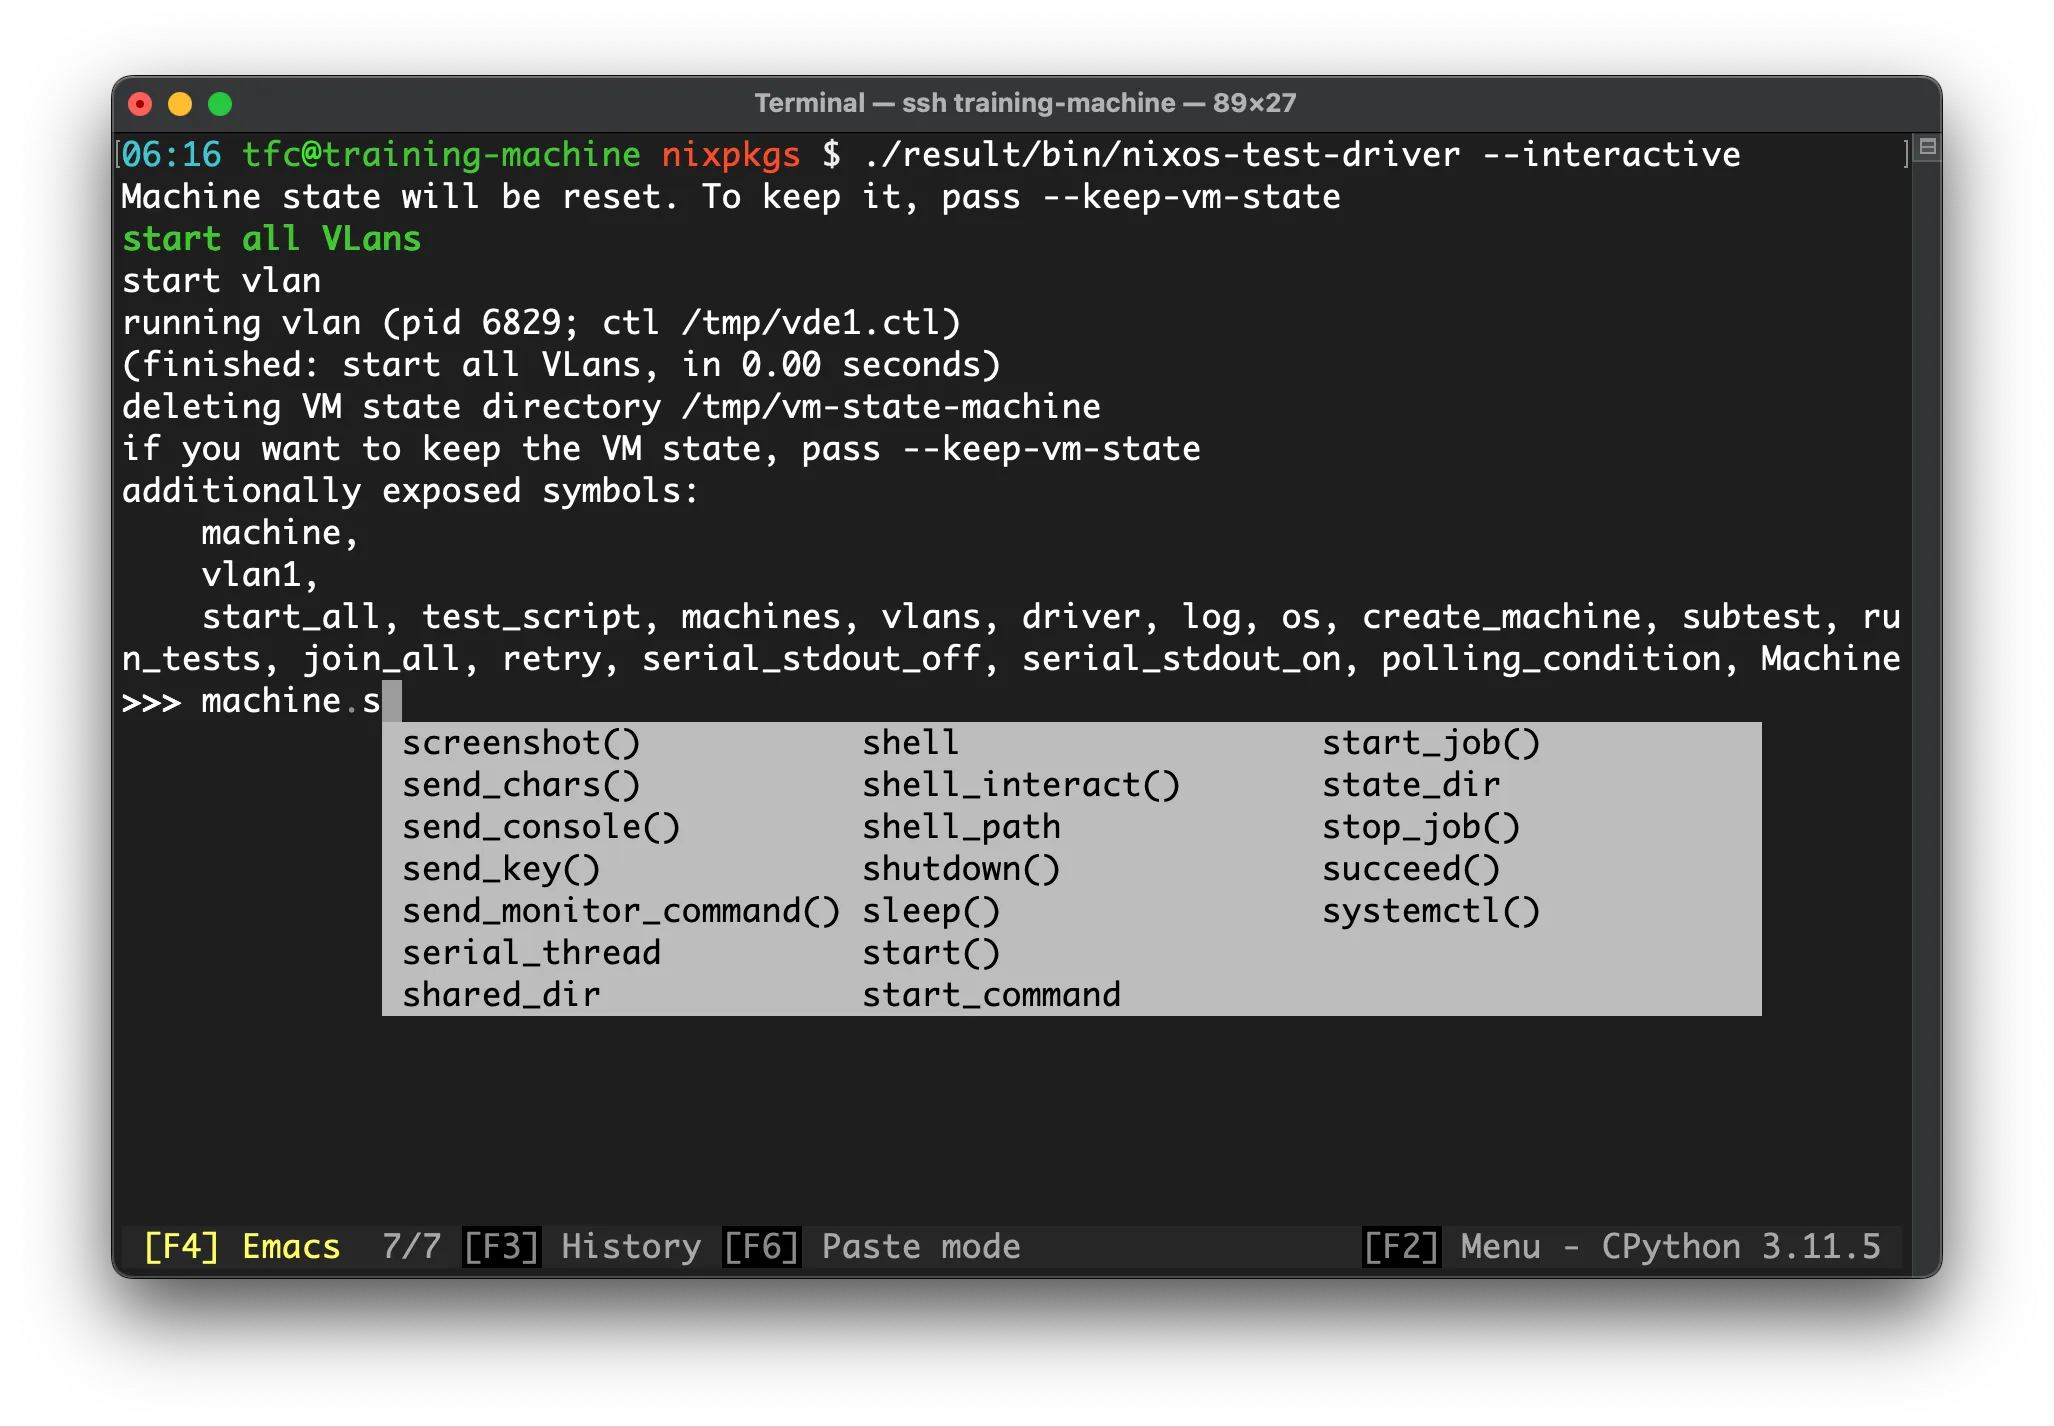
For such cases, the test driver has an interactive mode that enables us to run the test until it fails and then interact with the VMs to find out what’s wrong and how to fix it:
To build just the driver without running it, we can run
$ nix build .#default.driverInteractiveThis does not run the test as it builds only the driver. The version of Qemu that this driver uses is also a bit different - it contains more features than the Qemu version that is used for sandboxed tests.
Run this script (it’s in the result symlink that was created by the
nix build command) to obtain the same view as in the screenshot.
Inside the interactive test driver shell, we can now run start_all() to just
boot the VMs, or run_tests() to play the whole test script.
Of course, we can also log into the individual VMs using SSH or use their screens. To use SSH, activate SSH and forward the guest SSH port to an appropriate host port using:
# File: test.nix
# ...

  interactive.nodes.machine1 = { ... }: {
    services.openssh = {
      enable = true;
      settings = {
        PermitRootLogin = "yes";
        PermitEmptyPasswords = "yes";
      };
    };
    security.pam.services.sshd.allowNullPassword = true;
    virtualisation.forwardPorts = [
      { from = "host"; host.port = 2222; guest.port = 22; }
    ];
  };

# ...
Using the interactive... prefix, we can append these configuration lines to
the configuration of machine1 for interactive builds.
This is very useful as the debugging of specific parts of the configuration will
not contaminate the sandbox tests.
After rebuilding and rerunning the interactive test driver, we can now log into
the VM using ssh root@localhost -p2222 and enter an empty password.
This will give us a great debugging experience!
There is more about the possibilities in the NixOS documentation about the interactive mode.
Linting and Type Checking of Integration Tests
Tests can evolve into very long Python programs. To avoid flaky tests or late error feedback, the test driver provides two additional features that are activated by default:
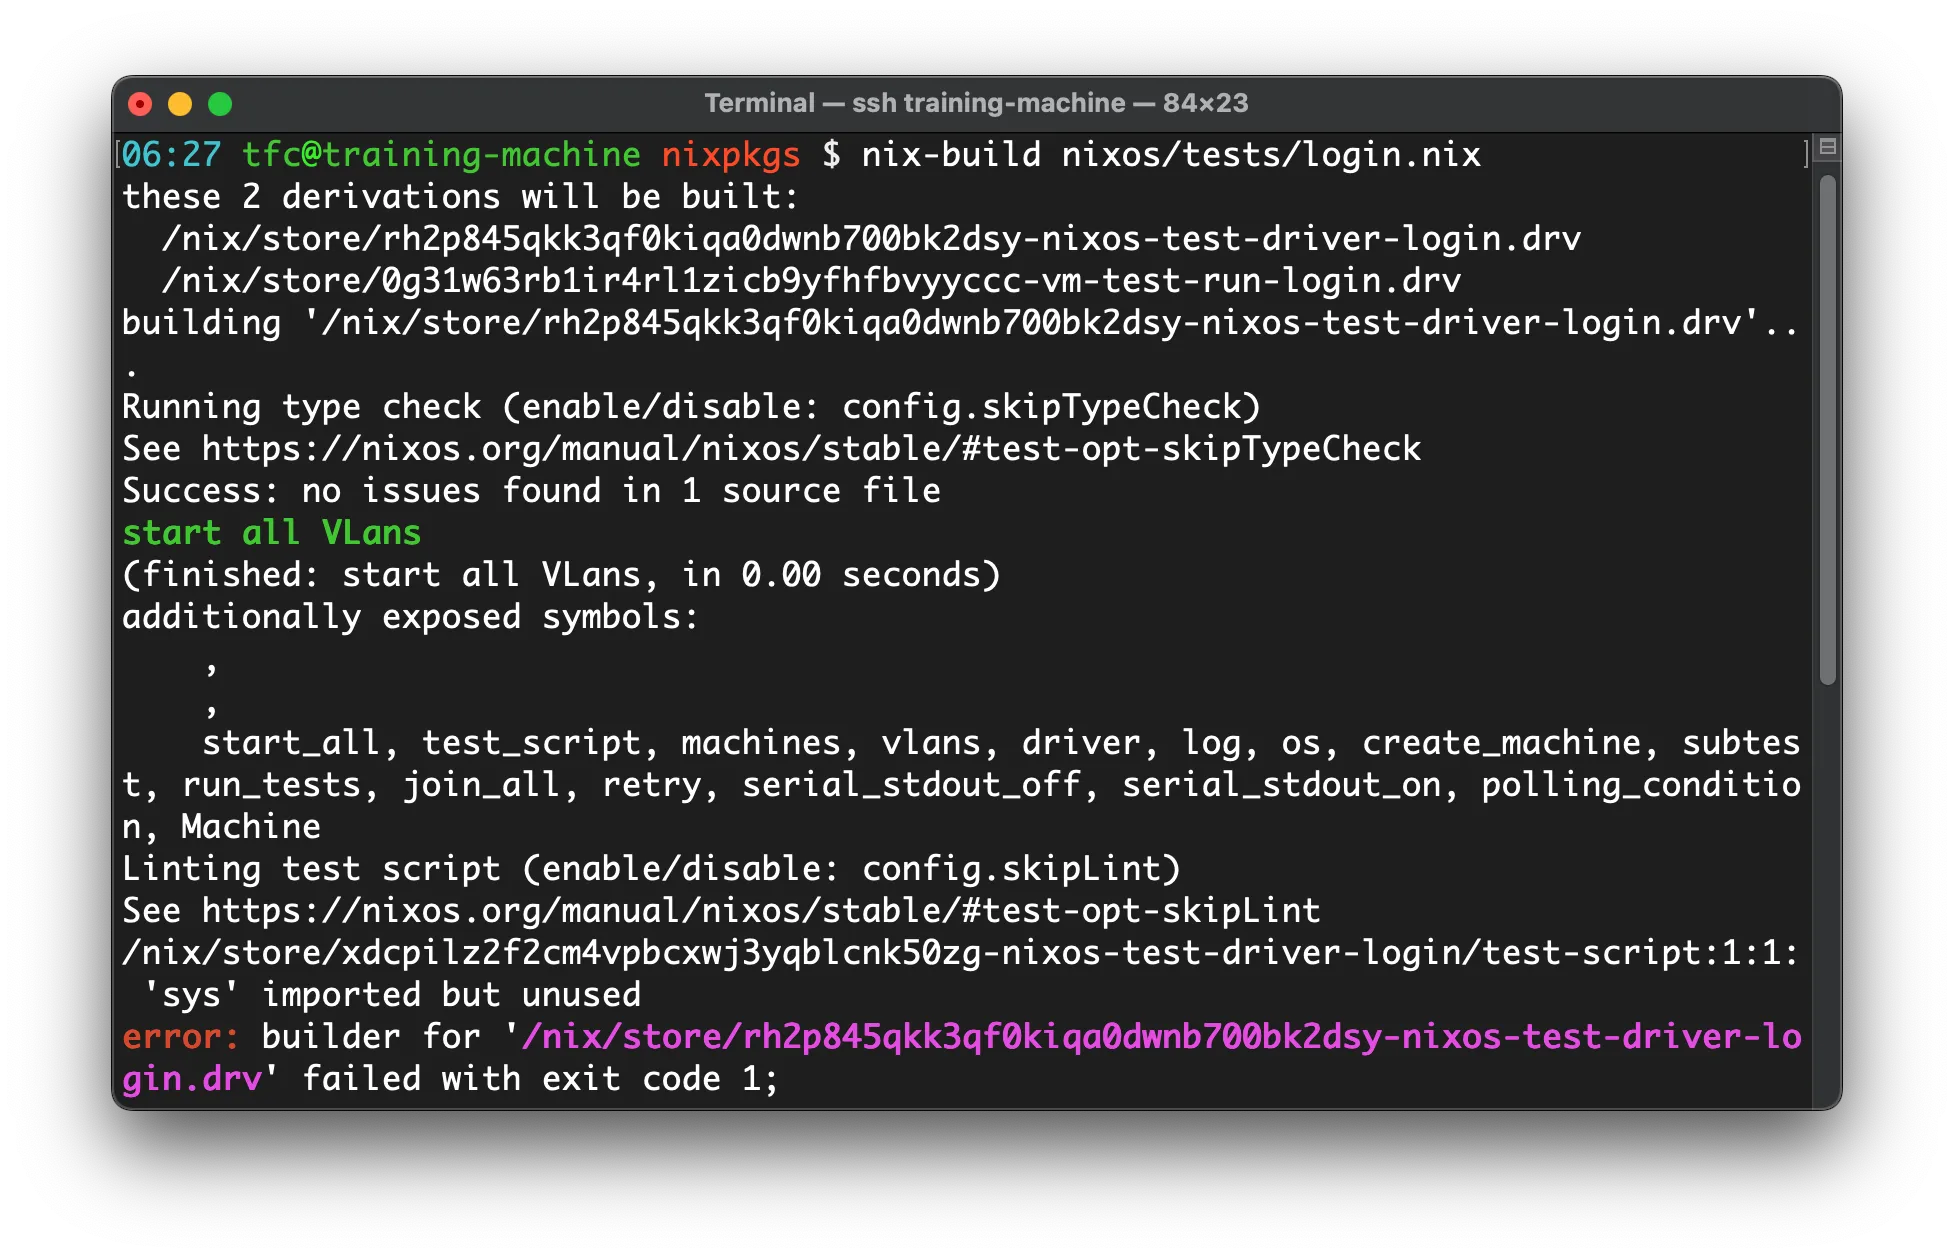
Both features are optional and can be disabled:
# File: test.nix
# ...

  skipLint = true;
  skipTypeCheck = true;

# ...
It is advisable to keep these features enabled in production code but they can be disabled during development as they might be annoying and slow down the build.
Other Useful Features
These other useful features need to be mentioned, too:
Global Timeout
For many tests, a maximum time can be defined. If the test takes longer than that, it is automatically aborted. This can increase the throughput of CI/build infrastructure a lot.
OCR
Especially when testing graphical applications, optical character recognition is very useful.
The Machine class provides functions like get_screen_text and wait_for_text, see NixOS Integration Test Driver Machine class methods in the docs.
Additional Python Packages
Sophisticated test scripts might need extra dependency libraries. Or maybe companies implement their own libraries for common testing functionality tailored to their products. In such cases, additional Python packages can be added to the test driver’s dependencies.
The following snippet could be appended to the example test.nix file to
illustrate how to use these features:
# File: test.nix
# ...

  # Set the timeout to 123 seconds
  globalTimeout = 123;

  # Enable Optical Character/Text Recognition
  # enables e.g.
  # machine1.get_screen_text()
  # machine1.wait_for_text(regex, timeout)
  enableOCR = true;

  # Add the Python packages numpy and pandas to the test driver
  extraPythonPackages = p: [ p.numpy p.pandas ];

# ...
Conclusion
Ok, after reading the docs a little bit and inspiring ourselves a bit from the hundreds of existing tests, we can get going with a test driver that feels like the world’s most powerful integration test framework.
What’s the catch?
Well, we need to have our software packaged in Nix.
This is the general deal with Nix: As soon as a package is successfully packaged with Nix, we get developer shells, deployment with and without containers, and reproducible testing basically for free. If you need help packaging your software or evaluating how much value-add Nix can bring to your software development processes, do not hesitate to contact us for a free initial meeting!
I am the author and maintainer of the Python port and I am happy to provide support if you need support with the current version or potential extensions of it.
Further links:


