Hosting OpenStreetMap on NixOS

This journey towards running OpenStreetMap on NixOS began as a part of a solution for a client, but the ease and speed of NixOS made it an eye-opening experience. Let’s explore the practicality of OpenStreetMap on NixOS in this article, where I show how to describe a running configuration as a NixOS module.
OpenStreetMap is an awesome service that is freely accessible over the internet, so most people don’t need to host it themselves.
Please note that all OpenStreetMap data (also the data that can be downloaded from https://geofabrik.de) is licensed under the Open Data Commons Open Database License (ODbL) and needs to be attributed correctly.
At the beginning of the year, we built a product together with a customer, where locating traveling assets on a world map was part of the key functionality. In this context, we had to make a self-hosted OpenStreetMap instance part of the deployment, because the whole appliance would later be running in an airgapped network.
For that purpose, one could simply get the map tiles and serve them from a big disk, but one of the customer requirements was that the map material would need to be customized.
This was my first contact with OpenStreetMap hosting, so I followed this tutorial from switch2osm.org, which explains how to set up your own OpenStreetMap instance on Ubuntu. In this article, we will have a look at how to perform the same setup as in the tutorial the NixOS way.
OpenStreetMap Architecture
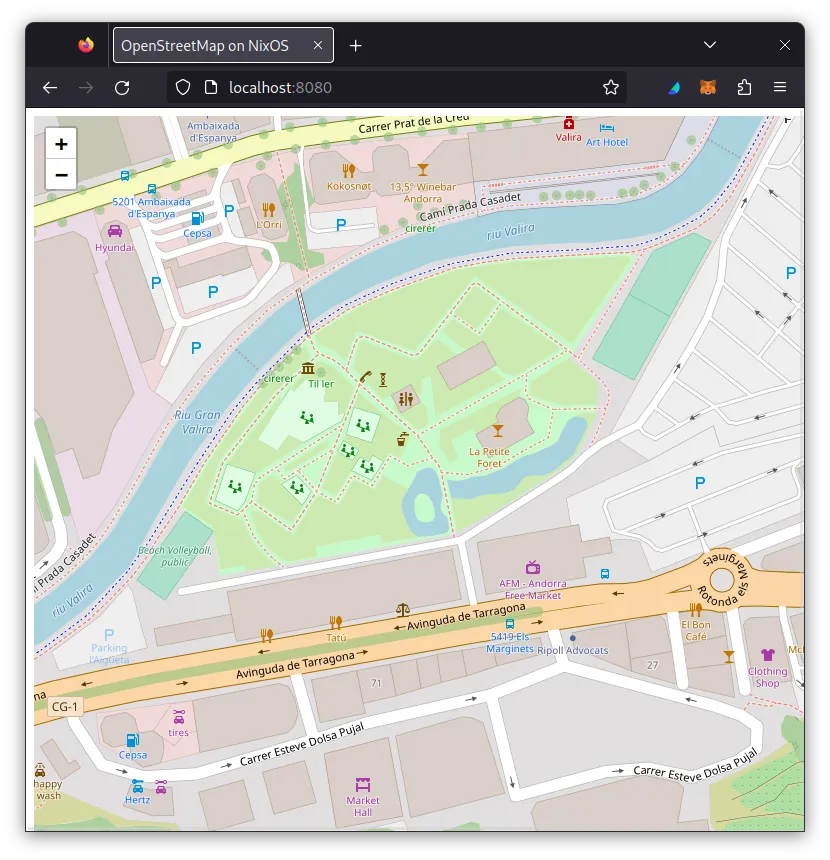
Whenever a user browses the world map, the Apache httpd service serves the map tiles as images:

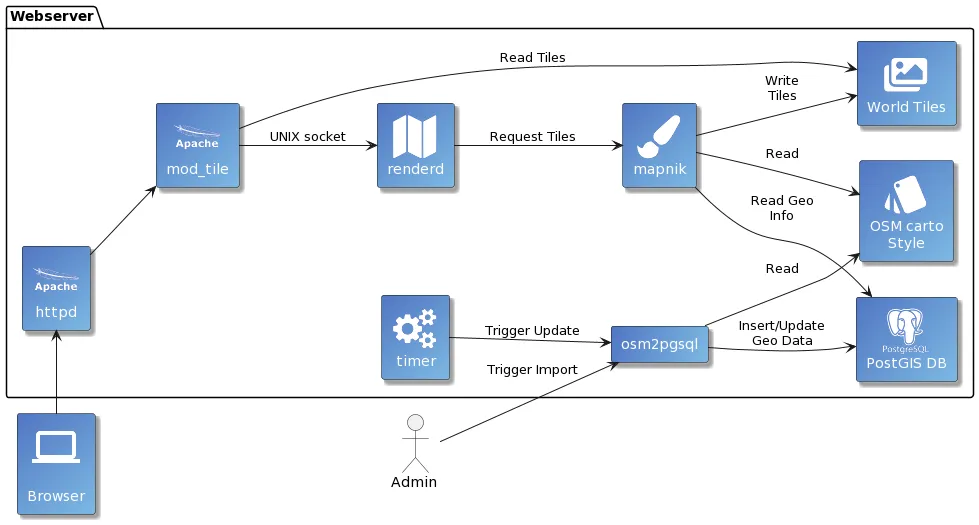
With and without NixOS, a minimal example setup of OpenStreetMap as shown by the tutorial that we are leaning on in this article, looks like this diagram:

Generally, some Javascript page (like the one on the screenshot above) will
perform all the queries for needed tiles and then put them together into a full
map that can be zoomed and scrolled around in.
The URL of every map tile then looks like this:
https://hostname/<zoom-level>/<x-coordinate>/<y-coordinate>.png
The coordinates are not GPS coordinates but map tile indices, of which there
are more the deeper the viewer zooms in.
Map tiles that have not been calculated before, are requested by Apache httpd’s
mod_tile plugin.
The renderd daemon (which comes with mod_tile) then uses mapnik (or other
tools) to read geo data from a PostGIS database (which
is a PostgreSQL database with plugins), and style
data from pre-configured style sheets.
As soon as map tiles have been calculated, the next viewer will get them directly from the disk. At some age, map tiles are deemed outdated and will be recalculated next time they are requested.
The PostGIS database needs to be filled with map data. This can either happen once with manual user intervention, or recurringly with updated map information. The real OpenStreetMap servers are updated every day as users update the geo-information all the time. We are only striving for a minimal one-time setup with the osm2pgsql tool in this post.
The Docker Dilemma
At first glance, using a pre-built Docker image seems like a convenient way to set up an OSM instance. However, it comes with its own set of challenges:
Complex Configuration
Docker images are easy to obtain, but complex apps require complex sets of runtime parameters and extensive configuration, resulting in big and clunky docker-compose files. This means that the inside of each Docker image is complex and its outside, too. Docker compositions are a leaky abstraction layer.
Limited Flexibility and Dependency Management
Customizing a Docker image can be a daunting task, especially when the container is complex to rebuild from scratch. Many containers are not even reproducible. This way, dependency handling and updates are very time-consuming.
In such cases, developers often go Kubernetes, although Kubernetes is meant as a platform for scaling, not for packaging.
NixOS: A Declarative Approach
NixOS as a Linux distribution takes a declarative approach to system configuration. It treats the entire system as code, making it highly reproducible and easy to manage.
In the following, we are going to define a NixOS module file that describes the whole configuration of a functional OpenStreetMap instance. The design goals of this module are:
Quick and Easy Reproducibility
New NixOS instances (VM, bare metal, container, …) can be spun up quickly with a working OSM setup after simply including this NixOS module.
Abstract Configurability
The NixOS module accepts further parameters to enable different OSM setups on different hosts. Users that set these parameters ideally do not need to know what happens beneath the configuration interface that we provide.
Good extensibility and maintainability
Using version control, it shall be easy to extend this module step by step, while at the same time keeping older servers running with older versions that are still easy to update regarding the rest of the system configuration and packages.
Building a VM from the Example Repo
Let’s start at the very beginning:
The OSM index page that simply renders some world data.
As a start, let’s use the Leaflet Javascript library
for that, as it provides a very simple frontend that fits into some minimal
index.html page.
This page will be served by our Apache httpd service and the rest happens
in the backend:
<html>
  <head>
    <title>OpenStreetMap on NixOS</title>
    <link rel="stylesheet" href="https://unpkg.com/leaflet@1.9.4/dist/leaflet.css" integrity="sha256-p4NxAoJBhIIN+hmNHrzRCf9tD/miZyoHS5obTRR9BMY=" crossorigin=""/>
    <script src="https://unpkg.com/leaflet@1.9.4/dist/leaflet.js" integrity="sha256-20nQCchB9co0qIjJZRGuk2/Z9VM+kNiyxNV1lvTlZBo=" crossorigin=""></script>
  </head>
  <body>
    <div id="map" style="width: 1000px; height: 1000px;"></div>
    <script>
      const start_coordinates = [42.54, 1.59]; // Andorra
      const start_zoomlevel = 11;
      const map = L.map('map').setView(start_coordinates, start_zoomlevel);
      const tiles = L.tileLayer('/hot/{z}/{x}/{y}.png', { maxZoom: 19, }).addTo(map);
    </script>
  </body>
</html>
We download one of the smaller countries from Europe for use as a small-scale example input that runs nicely in a smaller VM. Importing the whole planet or full continents can initially take multiple days and consumes a lot of RAM and disk space. Geofabrik.de provides OpenStreetMap data for all countries here. OSM is relatively hungry for disk and memory, so let’s just build map data for a smaller country like Andorra.
Now the way to package the whole OSM service infrastructure in a NixOS system consists of 3 steps:
- Package Apache httpd,
mod_tile,renderd- all these packages already exist. Let’s not forget that nixpkgs is the biggest and freshest FOSS package repository in the world. Therenderdpart however is new: It’s always been part of themod_tilerepository, but wasn’t available in nixpkgs until we upstreamed it at the beginning of the year - it is now part of NixOS 23.05 and newer. - Create a NixOS module that hides away the OSM complexities and provides the configurable interface that we promised earlier in this article. This NixOS module takes the packages and creates the necessary system configs for running and configuring OSM services and a PostGIS database.
- Spin up a bare metal machine, a VM, or a container using the NixOS module.
After step 1 was done, I already uploaded the result of step 2 to a GitHub repository: https://github.com/tfc/nixos-openstreetmap
This is the OSM NixOS module that configures a standalone OSM instance.
You can try out step 3 right now without even cloning the repository:
nix run github:tfc/nixos-openstreetmapThis command builds and runs a Qemu VM.
The VM script also automatically creates a new disk image file nixos.qcow2 in
the working directory - maps take some space, especially during creation.
In the beginning, there is no map, yet. It first needs to be imported. To do this, we need to run the following commands:
[root@nixos:~]# su - renderd

[renderd@nixos:~]$ osm-get-external-data
# takes some time ...
[renderd@nixos:~]$ osm-get-fonts
# takes some time ...
[renderd@nixos:~]$ wget https://download.geofabrik.de/europe/andorra-latest.osm.pbf
[renderd@nixos:~]$ osm-osm2pgsql-runner andorra-latest.osm.pbf
# takes some time ...
These commands can be entered either in the Qemu monitor window or via SSH. The qemu config forwards the guest’s SSH port to the host’s port 2222. The
rootpassword is left empty in this VM, just press enter when asked for a password.
These commands take some time, especially the last command that imports Andorra
into the PostGIS database.
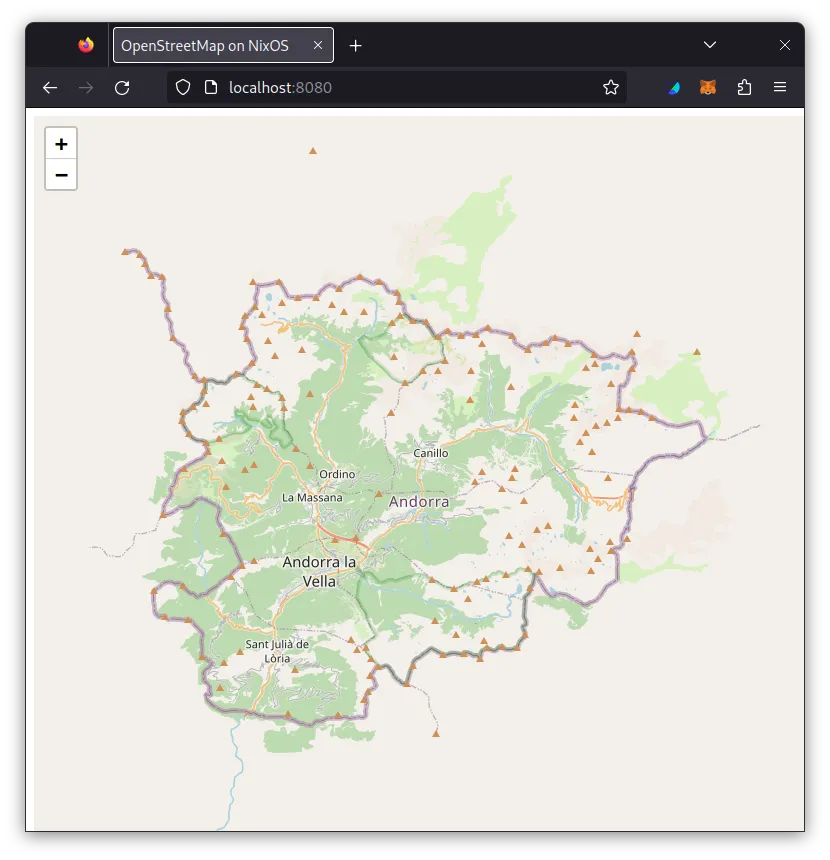
After it has finished, we can open the browser on http://localhost:8080 and
get this overview of Andorra:

Conclusion
After creating the NixOS module for this OpenStreetMap instance once, it is very easy to include into NixOS configurations that may also contain completely different additional services (as was the case in the customer setup).
While building this NixOS module, we learned:
- Even exotic packages are most of the time already available in nixpkgs.
- It is straightforward to create new packages and upstream them to nixpkgs.
- Writing the NixOS module took only ~3 hours. It consists of 270 LOC of which
a third are configuration lines for Apache httpd,
mod_tile, andrenderd.
The most time-consuming part of this little sub-project was finding out how to configure the database for performance. This was particularly easy to try out because spinning up a new OSM instance with completely different Postgres settings and file systems etc. takes just a minute, which facilitates experimentation to find the optimum.
The advantage of having your own OSM instance is of course that the map material can be customized with private extra information, and the styles can be customized without any limit. This can now be done and tested step by step.
The needed NixOS-related skills for this little project were:
- Modifying existing Nixpkgs packages
- Defining NixOS modules
- Building VMs for testing NixOS configurations
- Providing packages, NixOS modules, and ready-to-run NixOS configurations for VMs in a flake
All these topics are covered in the Nix & NixOS 101 class, and we are happy to help your organization bootstrap its Nix(OS) skills quickly and effectively with customized training.


